Flower pressing · UK sources / Decision guide
Baking parchment or absorbent paper for pressing flowers?
For home book presses and conventional flower presses. Sources checked on 19 October 2026.
For a book or ordinary flower press, choose absorbent paper around the flowers. Save baking parchment for a method that specifically calls for it, such as the RHS's iron method. Paper used with heat has a different job from the drying layers in a press. RHS method comparison
That is a practical starting choice, not a claim that parchment always produces mould. Flower thickness, moisture and the drying conditions also matter. Changing the paper alone is not a guarantee of success.
Choose paper for the result you want
Blotting paper is a straightforward choice. The University of California's pressing guide also lists watercolour paper and quality construction paper. Smooth paper towels can work, but an embossed pattern may transfer to petals. Keep similarly sized, similarly thick flowers together so a thick flower does not hold the paper away from a smaller one. UC Agriculture and Natural Resources guidance
If protecting a favourite book is your main concern, use a different book. The same UC guide warns that flowers can stain and distort book pages. An inexpensive book you do not need to keep pristine removes an unnecessary risk from a first attempt.
Baking paper is not a reason to abandon a batch that is drying successfully. But if you are starting again after a damp result, an absorbent-paper method gives you a clear routine to follow and inspect.
A simple stack for a flower press
Place the plant material between blotting-paper layers, with card outside those layers and firm boards above and below. Apply even pressure. The RHS herbarium method uses corrugated card outside the blotters; the flowers do not sit directly against it. RHS herbarium pressing instructions
Scroll the diagram sideways to read all labels.
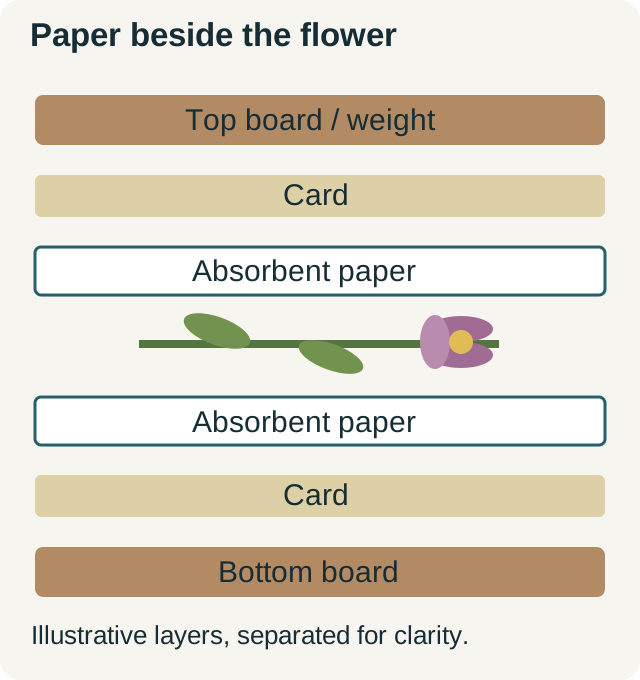
For a book, Kew describes sandwiching the flower between paper inside the book, closing it carefully and adding more books for weight. Keep it in a warm, dry place and check daily until the flower no longer feels damp. Its method removes any added kitchen-roll layer after the first day. Kew's book-press method
Check early rather than waiting for a fixed deadline
The RHS herbarium method calls for an inspection after 24 hours and replacement of damp drying layers, followed by regular checks. It gives a broad drying range because the specimen and conditions change the result. A flower that still feels damp is not ready simply because a fortnight has passed. Inspection and drying guidance
Use the first check to ask three questions:
- Is the paper damp? Replace the damp drying layers rather than closing everything back up unchanged.
- Is the flower unusually bulky? Consider a flatter bloom or separate petals for the next attempt; the RHS notes that individual petals may dry more successfully. RHS pressing tips
- Is the pressing location dry? Kew's method relies on a warm, dry place, not a damp storage spot. Kew's instructions
For the next batch, collect on a dry day after the dew has gone, and only where you have permission. Kew's collecting advice
Why do some instructions recommend baking paper?
Read the whole method, not just its supply list. The RHS lists absorbent papers for its book and wooden-press methods, but baking or greaseproof paper for its iron method. That heat-assisted procedure uses low heat without steam and cooling between applications; it is a separate technique, not a paper substitution in a closed book. RHS's three methods
For a sentimental bouquet, decide what you are willing to change before beginning. Pressing makes a flat keepsake, not an intact three-dimensional bouquet. Photograph the arrangement first and try a spare, less important bloom before committing all the flowers. This is a precaution, not a promise that an exact colour or shape will survive.
The useful distinction is simple: pick one complete method, use its specified layers, and check that moisture is actually leaving the flowers. This guide compares published instructions; it does not report a side-by-side paper test.