Yarn crafts · workspace planning / Decision guide
Set up yarn winding when your table will not take a clamp
A clamp-free yarn swift solves only half of the usual winding setup. The swift holds the hank open; a separate ball winder turns the yarn into a ball or cake. If the winder still clamps to a table, you still need a suitable mounting surface.
Choose your route before buying equipment:
- No usable edge, but enough clear tabletop: a clamp-free tabletop swift plus hand winding avoids a winder clamp altogether.
- No suitable furniture edge, but room for another support: investigate a purpose-built winding stand or compatible support for the equipment you already own.
- Little space or only occasional hanks: hand winding with the loop supported may be enough. You do not have to buy both tools.
This is a workspace-planning guide, not a tested ranking of swifts, winders or their stability.
Identify what is wrong with the table edge
Look underneath as well as on top. A clamp can fail to fit because the top is too thick, the edge is rounded or bevelled, an apron blocks the lower jaw, or the clamp cannot reach a flat contact area. A surface may also be unsuitable for clamping even when its thickness appears correct. Check the furniture and equipment instructions rather than forcing a fit.
Write down the tabletop thickness, the available flat area above and below, and any obstruction behind the edge. Compare these with the clamp opening and reach for the exact winder or swift. An advertised maximum opening answers only the thickness question.
For example, Stanwood says its YBW-M compact ball winder accepts a table about 1¾ inches (4.4 cm) thick. That model-specific limit does not establish clearance around your table’s apron, and it should not be transferred to other Stanwood winders.
Separate the swift’s capacity from the space it occupies
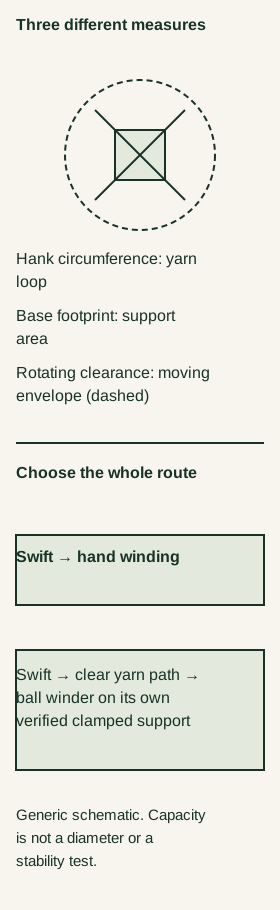
Three measurements matter:
- Hank capacity: the loop circumference the swift can hold.
- Base footprint: the area needed to support the stationary base.
- Rotating clearance: the space swept by the moving arms, pegs and yarn.
They are not interchangeable. A base can fit on a small surface while the moving parts still strike something nearby.
ChiaoGoo describes its wooden tabletop swift as requiring no clamp, with adjustable pegs and non-skid pads. It lists capacity up to 62 inches, paired with 155 cm in its own specification. Those are the manufacturer’s rounded figures for the hank, not a diameter or a measured workstation width. Ask for clarification if your hank is close to the stated limit.
Stanwood’s tabletop Amish-style swift lists a circumference range of 2½–6 feet, equivalent to 30–72 inches (approximately 76–183 cm). Its description also mentions non-slip pads. Neither feature is evidence that we have tested its grip on your furniture. This particular listing excludes international shipping, so it is a specification example rather than a worldwide buying route.
Measure an opened hank without stretching it, keeping its ties intact while you check it. If you measure the full loop laid out double, end to end, twice that length approximates the circumference. Do not use yarn yardage or the dimensions of the twisted package as the hank circumference.
Scroll the diagram sideways to read all labels.
Choose the support style deliberately
A tabletop cross-arm swift is worth considering when you have clear surface area but no usable edge. Confirm its assembled rotating envelope and the surface required beneath its base. Do not infer either measurement from the maximum hank capacity.
An umbrella swift on a genuinely freestanding base can be another route, but inspect the exact model and its instructions. “Umbrella” describes the opening structure, not whether the unit needs a clamp. A pictured base is not enough to verify clamp-free operation.
For instance, Scheepjes’ umbrella swift page describes versions with and without a base but also gives clamping instructions. That wording is not sufficient to recommend a particular version as freestanding. Get the intended mounting method and assembled dimensions confirmed before ordering.
A separate winding station moves the mounting point away from your furniture. Schacht’s Winding Station is designed to have a swift and ball winder clamped to its top. This is a furniture-edge workaround, not an entirely clamp-free system. Check the stand’s footprint and each tool’s compatibility rather than assuming any pair will fit.
Do not balance a loose board on furniture as an improvised mounting platform or use extra clamp force to overcome a poor fit. A suitable support needs to be secure in its intended configuration.
Lay out the entire winding path
Before ordering, sketch the swift, winder or hand-winding position, and the strand between them. Mark the swift’s verified rotating envelope and the winder’s moving parts. Leave enough access to operate the handle, guide the yarn as instructed and remove the finished cake.
Check the route from above and from the side. A clear tabletop can still have a shelf, lamp or chair back at the height of the yarn. The strand should have an unobstructed route to the winder’s guide, rather than dragging around furniture or passing through the swift’s moving structure.
There is no universal distance between these tools that proves every setup will work. Follow the equipment instructions, start slowly and stop if anything shifts, catches or pulls unevenly. Resolve the obstruction before continuing rather than winding harder. Keep pets and children away from loose yarn and moving equipment.
Also measure where the equipment will live afterward. “Disassembles” or “folds” does not tell you the size of the longest piece, storage box or separate base. Include the time and effort of clearing the surface whenever you want to use it.
Try the no-purchase route first
For an occasional hank, support the opened loop on a suitable chair back, your knees or another person’s hands, then wind by hand. Keep the loop orderly instead of pulling from a collapsed pile. Remove only the holding ties once you have identified them and the yarn ends.
Knit Picks’ illustrated hand-winding guide shows these support options and how to leave an accessible centre tail. Follow that demonstration if you want a centre-pull ball; an ordinary hand-wound ball is also a valid outcome.
If you later buy a clamp-free swift, you can continue hand winding from it. Add a mechanical winder only when its benefit is worth another tool, mounting requirement and storage space.
Before spending, you should be able to name the hank-size range you need, the verified space occupied by the swift in motion, and the way you will wind the yarn. If one of those is still unknown, a matching measurement or manufacturer answer is more useful than another product recommendation.